
How to Create a Drop-Down List in Excel
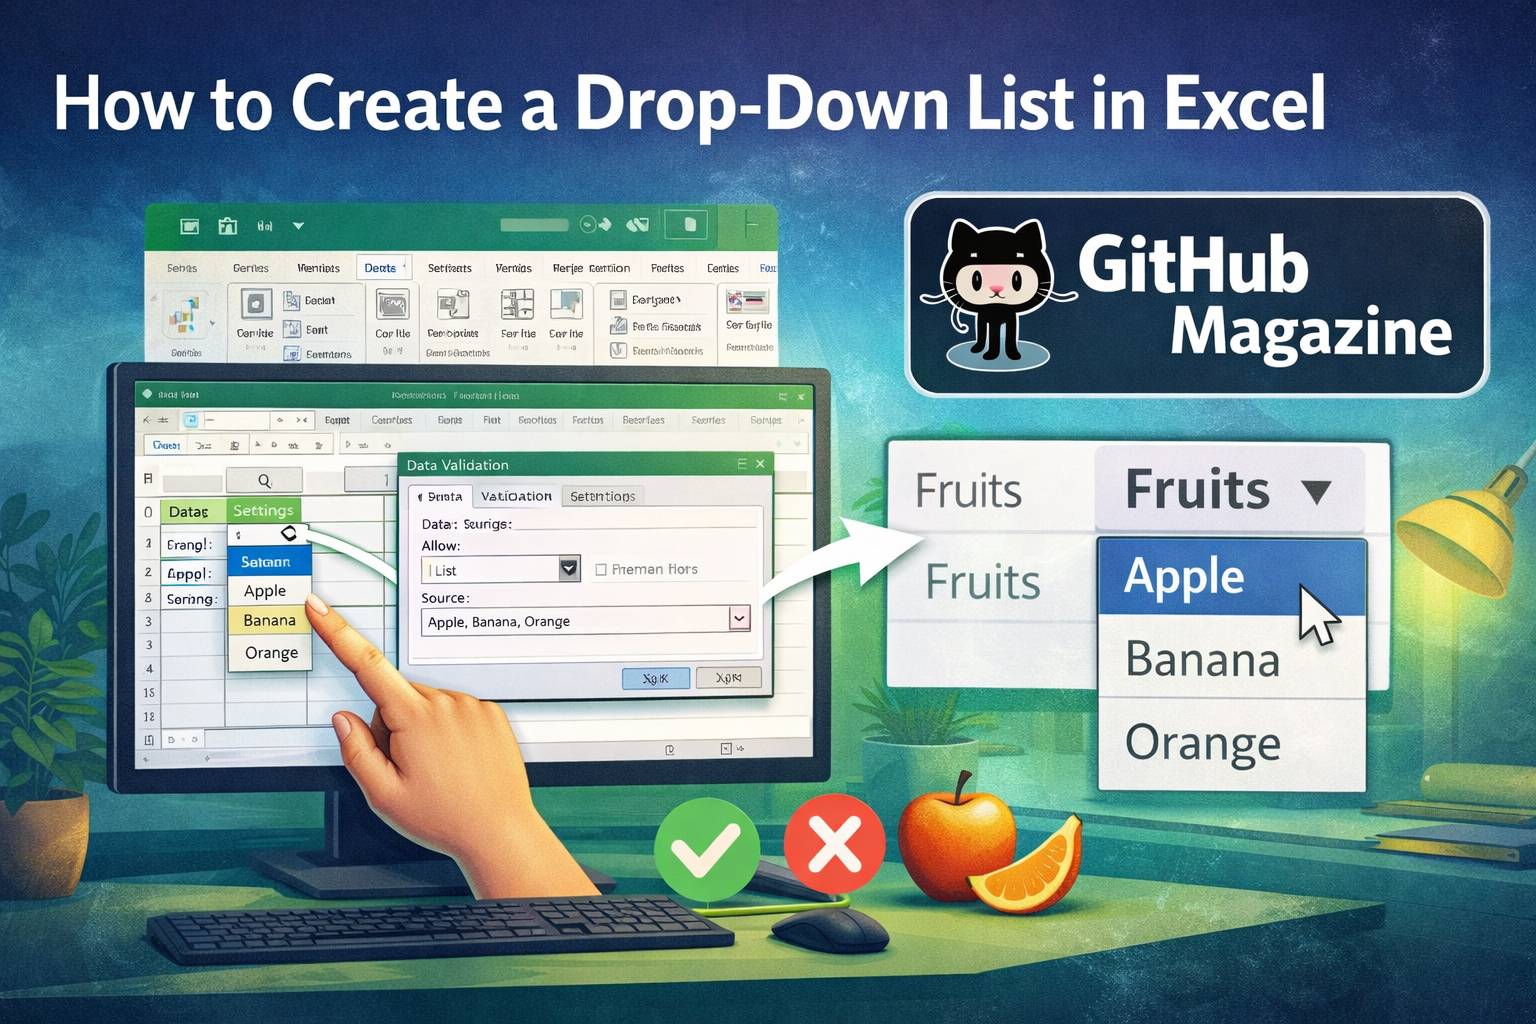
When I first started building structured spreadsheets for collaborative projects, I quickly realized that most data errors were not caused by complex formulas. They came from inconsistent typing. One person wrote “Completed,” another wrote “complete,” and someone else typed “Done.” The solution was not another formula. It was control. If you are wondering how to create a drop-down list in Excel, the answer is straightforward: use the Data Validation feature, choose “List” as the validation type, and define your source values. Within seconds, Excel transforms an ordinary cell into a guided input field that reduces mistakes and speeds up work.
But creating a drop-down list is more than clicking a few buttons. It is about building reliable systems. In professional environments, from project dashboards to inventory management sheets, drop-down lists quietly enforce consistency and improve reporting accuracy. In this guide, I will walk through the fundamentals, advanced techniques, practical use cases, and best practices that elevate this small feature into a powerful productivity tool.
What a Drop-Down List Really Does
At its core, a drop-down list in Excel limits what users can enter into a cell. Instead of free-text input, the user chooses from predefined options. This is accomplished through Excel’s Data Validation tool.
The impact of this feature is often underestimated. In shared spreadsheets, even small inconsistencies can break pivot tables, filters, and dashboards. A drop-down list ensures that entries remain standardized. It prevents spelling variations, inconsistent capitalization, and invalid categories. Over time, this improves the reliability of analysis and reporting.
Drop-down lists are especially valuable in structured templates such as:
- Status tracking sheets
- Budget planning workbooks
- Data collection forms
- Inventory logs
- Team reporting dashboards
By narrowing input choices, you reduce friction and eliminate ambiguity.
Step-by-Step: Creating a Basic Drop-Down List
Creating a simple drop-down list requires only a few steps.
Step 1: Prepare Your List Items
Start by typing the list of allowed values somewhere in your workbook. This could be in a separate column on the same sheet or on a dedicated sheet for reference data. For example:
- Not Started
- In Progress
- Completed
- On Hold
Keeping the source list organized and free of blank cells is important for clean results.
Step 2: Select the Target Cell
Click the cell or range where you want the drop-down to appear. You can apply it to a single cell or hundreds of rows at once.
Step 3: Open Data Validation
Go to the Data tab on the ribbon. Click Data Validation. A dialog box will appear.
Step 4: Configure the List
In the dialog box:
- Under Allow, choose List.
- Ensure “In-cell dropdown” is checked.
- In the Source field, either select the range containing your list items or type the values manually separated by commas.
Click OK.
Your selected cell now displays a small arrow that reveals your predefined options when clicked.
Manual Entry vs Range-Based Lists
There are two primary methods for defining your drop-down values.
Manual Source Entry
You can type items directly into the Source box, separated by commas. This works well for short, static lists.
Advantages:
- Quick setup
- No additional sheet required
Limitations:
- Difficult to update later
- Not scalable for large lists
Range-Based Source
You reference a range of cells that contains your list values.
Advantages:
- Easy to update by editing the source cells
- Better for long or frequently changing lists
- More maintainable in collaborative environments
This method is generally recommended for professional use.
Comparison Overview
| Feature | Manual Entry | Range Reference |
|---|---|---|
| Setup Speed | Very Fast | Fast |
| Maintenance | Manual Editing Required | Update Source Cells |
| Scalability | Limited | Highly Scalable |
| Best Use Case | Short Static Lists | Dynamic or Growing Lists |
Using Named Ranges for Cleaner Design
As spreadsheets grow, direct cell references like A1:A10 become harder to manage. I prefer using named ranges.
To create a named range:
- Select your source list.
- Click in the Name Box near the formula bar.
- Type a meaningful name such as StatusList.
- Press Enter.
Then, in Data Validation, set the Source as:
=StatusList
This improves readability and makes the workbook easier to maintain, especially when used across multiple sheets.
Creating Dynamic Drop-Down Lists
Static lists are helpful, but dynamic lists are transformative. A dynamic drop-down automatically expands when new items are added to the source.
Method 1: Using Excel Tables
Convert your source list into a table by selecting it and pressing Ctrl + T. Tables automatically expand when you add new rows.
When you reference the table column as your validation source, new entries become available in the drop-down without modifying settings.
Method 2: Using Formulas
Advanced users sometimes use formulas such as OFFSET combined with COUNTA to create expanding ranges. This method calculates the height of the list based on non-blank cells.
Dynamic lists reduce maintenance and support long-term scalability.
Dynamic vs Static Comparison
| Aspect | Static List | Dynamic List |
|---|---|---|
| Auto Updates | No | Yes |
| Maintenance Effort | Medium | Low |
| Best For | Fixed Templates | Growing Data Sets |
| Complexity | Simple | Moderate |
Dependent Drop-Down Lists
Dependent lists, sometimes called cascading lists, change available options based on another selection.
Example:
- First list: Category
- Second list: Subcategory
If “Fruits” is selected, the second list shows apples and oranges. If “Vegetables” is selected, it shows carrots and spinach.
This requires:
- Separate named ranges for each category
- The INDIRECT function to reference the correct range
Dependent drop-downs are useful for structured forms, surveys, and inventory classification systems.
Improving User Experience with Validation Messages
Data Validation allows more than just restricting values. You can also add:
- Input messages that appear when a user selects the cell
- Error alerts that appear if invalid data is entered
There are three types of error alerts:
- Stop: Prevents invalid entry
- Warning: Allows entry after confirmation
- Information: Displays a notice but permits entry
Choosing the right alert type depends on how strict your data requirements are.
Real-World Applications in Professional Workflows
In structured reporting environments, drop-down lists improve operational efficiency. I have seen them used effectively in:
Project management dashboards to standardize status reporting across teams.
Financial models to categorize expense types, ensuring accurate aggregation.
Human resource tracking sheets to control department and role entries.
Customer support logs to maintain consistent ticket classifications.
The value lies in uniformity. When every entry follows predefined categories, analysis becomes reliable and automation becomes possible.
Common Issues and Practical Fixes
Even simple features can cause confusion.
If the drop-down arrow does not appear, confirm that “In-cell dropdown” is enabled and the cell is not merged.
If new list items are not showing, verify that your source range includes the new cells or convert the source to a table.
If dependent lists fail, double-check spelling in named ranges. INDIRECT requires exact matches.
If you need to remove a drop-down, open Data Validation and click Clear All.
These fixes address most practical issues users encounter.
Best Practices for Clean Spreadsheet Architecture
When designing professional spreadsheets, I follow a few core principles:
Keep source lists on a separate sheet to reduce clutter.
Avoid blank cells inside your list range.
Use tables whenever possible for scalability.
Name ranges clearly and descriptively.
Document complex logic so collaborators understand dependencies.
These practices make your workbook easier to scale and maintain over time.
Takeaways
- Drop-down lists are created using Excel’s Data Validation feature.
- Range-based lists are more maintainable than manual entries.
- Named ranges improve clarity and reusability.
- Dynamic lists automatically expand with new data.
- Dependent lists create structured, interactive forms.
- Proper validation messages enhance usability.
- Clean source data ensures reliable reporting.
Conclusion
Small design decisions often shape the quality of our work more than large technical features. Drop-down lists may look simple, but they bring order to spreadsheets that might otherwise become chaotic. By guiding input and enforcing consistency, they strengthen data integrity and reduce errors that ripple through reports and dashboards.
When I build structured workbooks today, I treat drop-down lists as foundational elements rather than optional enhancements. Whether you are creating a lightweight tracking sheet or a complex operational model, mastering this feature elevates your spreadsheet design. With thoughtful planning, dynamic techniques, and clear validation rules, you can transform Excel from a basic grid into a controlled and reliable data system.
FAQs
How do I edit an existing drop-down list?
Select the cell, open Data Validation, and modify the Source field or adjust the referenced range.
Can I copy a drop-down list to other cells?
Yes. Copy the cell and paste it into other cells. The validation settings transfer automatically.
How do I remove a drop-down list?
Open Data Validation for the cell and click Clear All.
Why is my new item not appearing in the list?
Your source range may not include the new cell. Convert your source into a table for automatic expansion.
Can I allow users to type values not in the list?
Yes. Change the error alert style from Stop to Warning or Information.